Here’s your step by step guide to make fresh, creamy 24-hour probiotic yogurt.

Do you eat 24-hour probiotic yogurt?
Well, if you’re one of three million Americans who have celiac disease, or if you’re one of seven hundred thousand people who have ulcerative colitis, or if you’re one of the twenty-five to forty-five million people in the U.S. suffering from irritable bowel syndrome, or you’re someone that is taking or has taken a lot of antibiotics, then you probably should be eating this nutritious yogurt.
All of the above diseases, plus several more, are associated with a disruption in the intestinal microbiota know as dysbiosis. See John’s article here: How 24-Hour Probiotic Yogurt Can Help Improve Your Health. Some important researchers are beginning to believe that dysbiosis could be the root of many modern diseases. See Chris Kresser’s article here.
One of the ways suggested to treat the above conditions is by the introduction of good bacteria into your intestines by the means of probiotics. Most of you know this can be done by taking commercially produced probiotics in pill form.
However, I believe that one of the best ways of treating disease is by eating nutritious whole foods. That’s where yogurt comes in. Yogurt is a food that is known to be packed with probiotics.
The problem is that not all yogurts are equal. Most commercially made yogurts contain added sugar and fillers, some are made with inferior milk, and you just can’t be exactly sure how many probiotics they actually contain.
Think about it, do you really know how long it is between the time the yogurt is made until the time you buy it? Those small cultures in yogurt do have a shelf life.

Is homemade yogurt nutritious?
Notice I didn’t ask if you ate yogurt. I asked you if you ate 24-hour probiotic yogurt. This yogurt is packed with probiotics (often more than you can get in pill form), is bursting with vitamins and minerals, and if made from grass fed milk, has an abundance of the important beneficial fatty acid conjugated linoleic acid (CLA).
And here’s something really cool. It’s often well tolerated by those who are lactose intolerant because of its 24-hour fermenting process.
Unfortunately, this yogurt can’t be bought in stores. You have to make it yourself. While that’s not as convenient as just buying it off the shelf, consider the benefits.
In return for the hour it takes to prepare about forty-two ounces of yogurt, you get to make a great tasting food that will also add significantly to the well-being of yourself or someone you love.
You may have seen this yogurt called SCD yogurt. SCD stands for Specific Carbohydrate Diet. Elaine Gottschall popularized this yogurt in her book, Breaking The Vicious Cycle.
This yogurt is basically SCD yogurt made from grass milk, but I’m going to share some tips with you that will help you make it perfect every time.
John was able to start eating 3/4 of a cup right away and saw an immediate boost in health. However, if you believe you are very dysbiotic or you have some serious gut issues, you may want to start slowly.
Introducing tons of probiotics into your gut right away may upset your system because of a reaction secondary to the die-off of pathogenic bacteria. It’s always best to first consult with your M.D. or functional health practitioner.
Therefore, concerning the consumption of probiotic yogurt for those who have severe gut issues, Gottschall states,
… others can have problems at first. After the starter diet has been completed the yogurt can be tried by introducing it very slowly. Try a teaspoon the first day and watch for any reaction, if all is well, try two the second day, gradually increase it each day. If you have a reaction to it then there may not have been enough healing yet and it may be best to leave it for now and try again later.
Ready to make some yogurt?
Note: If you’d like to save these simple steps for later, you can get the PDF version when you subscribe.
Instructions
*Free printable recipe card is available at the end of the post.
Links are affiliate links which means I will earn a small commission if you buy the item at no extra cost to you.
I’ll make a small confession. I was a little skeptical about doing this at first. I had never made yogurt before. I didn’t even know if it was possible to make yogurt correctly at home. But it is. And I’m glad to share these nine simple steps with you.
Step 1. Choosing your yogurt maker
It turns out that making nutritious creamy yogurt at home is pretty simple. There are many different ways. Some people make it in their slow cooker, others choose to make it in the oven with the oven light on, while others pick a cooler that has been warmed with bottles of hot water.
We chose to use the Euro Cuisine YM80 electric yogurt maker.

The Euro Cuisine yogurt maker comes with seven six-ounce glass jars, just the right size for individual servings. A clear lid allows you to see what’s going on while your yogurt ferments. When you turn the unit on, there is a light so you know that it is working.
Some people have recommended buying the additional top tier in order to make double the amount of yogurt. However, after reading the comments on Amazon, we decided not to go with the tier. It seemed most commenters said it didn’t work well because of unequal heat dispersion.
If you need to make more yogurt (you’ll probably want to after you taste it), you can buy an extra set of jars so you can start on a new batch before you have even finished eating the first seven jars of yogurt.
Euro Cuisine recommends fermenting for 8 hours. We let it go for a full 24 hours. There is no timer on this machine so you have to make a note when you begin and shut it off manually when you are finished.
This yogurt is so fresh and creamy every time we make it. John loves it plain right out of the jar. I like to add some fresh organic berries. Choose your favorite toppings or stir in some raw honey if you like.
Step 2. Preparing a clean workspace in the kitchen
Make sure your pot, jars, measuring cups, spoons, even your thermometer and work area are wiped clean. Here’s a quick checklist:
- frothing thermometer for heating milk
- digital thermometer
- 2 cup measuring cup
- 1 cup measuring cup
- 1/8 teaspoon
- spoon for stirring
- paper towels
- 3-quart pot
- a bowl of ice
- dimmer switch (This item is extremely important. I’ll talk about it later)
- GI ProStart
- Good quality milk
Good quality milk and a yogurt starter are the only ingredients you’ll need.
 Step 3. Choosing Grass Fed Milk
The healthier your milk, the better your yogurt will be. Since I don’t have access to raw milk, I use organic, non-homogenized whole milk from grass-fed cows.
Using this milk is an excellent way to increase the nutrient content of your yogurt. Grass-fed yogurt is richer in omega-3 fats and the beneficial fatty acid conjugated linoleic acid (CLA).
CLA has been linked to the following health benefits: superior heart health, the suppression of tumors, reduced body fat, and greater fat loss in the obese and overweight. Milk from pastured cows may contain up to 5 times the amount of CLA found in the milk of grain-fed cows.
Step 4. Choosing Your Yogurt Starter
Some type of yogurt culture starter will be necessary to produce beneficial bacteria in your yogurt. Some people add some yogurt from a previously made batch to their new batch as a starter. We have heard mixed results with this.
We have chosen to use GI ProStart from GI Prohealth. It contains the following strains of beneficial bacteria: Streptococcus thermophilus, Lactobacillus bulgaricus and Lactobacillus casei. This starter consistently produces a thick creamy yogurt.
Step 5. Heat the milk
Measure out 42 ounces of milk and pour into your pot that has been set up with the frothing thermometer clipped on. The frothing thermometer accurately measures the temperature of the milk while it heats.
Heat the milk slowly over a medium flame until it reaches 180℉. Stir occasionally to keep the milk from scorching. The milk is heated to kill pathogenic bacteria that might be present in the milk.
Theoretically, all bacteria should be killed in the milk. The yogurt starter will provide the new beneficial bacteria for you yogurt.
 Step 6. Cool the milk
Turn off the heat and let the milk cool to room temperature (80-90 ℉). Stir occasionally. To speed up this process, we fill a large bowl with ice and place the pot in the ice bath.
Since my frothing thermometer does not read below 100℉, I use my digital thermometer to accurately determine that the milk is below 90℉.
 Step 7. Add the yogurt starter
Pour about a 1/4 cup of your room temperature milk into a clean, large measuring cup (don’t use the cup you used to measure the milk before it was boiled). Spoon 1/8 of a teaspoon of GI ProStart yogurt starter into another 1 cup measuring cup.
Now pour the 1/4 cup of room temperature milk from the larger measuring cup into the smaller one. Stir until the yogurt starter is dissolved.

Then pour that mixture back into the original measuring cup and mix well. Some of the ProStart may clump and not make it back into the original measuring cup. That’s why we mix it in separate cups. You can pour it back and forth until all the ProStart is in the original measuring cup.
After the ProStart is sufficiently dissolved, pour the mixture back into the pot of milk and stir it in very well.
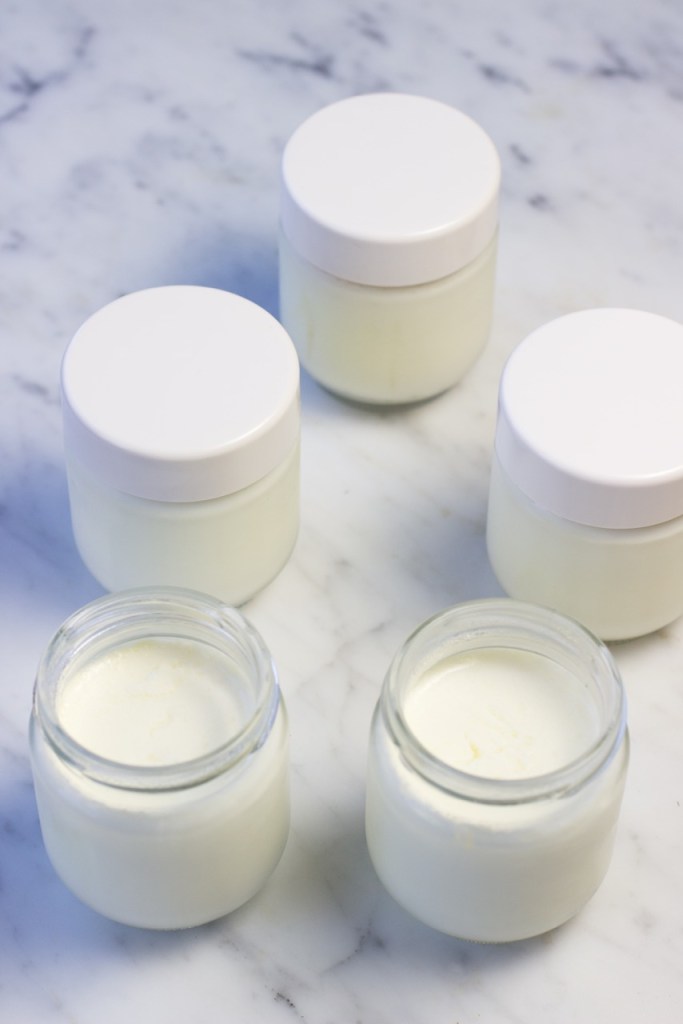
 Step 8. Place jars in your yogurt maker
Now carefully divide your milk that has been mixed with yogurt cultures into your jars and set the uncovered jars in the unit. The outside of each jar should be dry. Be careful not to spill any liquid on the unit as this can cause damage to the electronics.
Cover with the lid and switch on and let the unit run for 24 hours. The yogurt should be kept at a temperature of 110℉. I don’t think a few degrees either way makes a big difference.

This is extremely important. It’s a good idea to check the temperature of your yogurt as its fermenting. We use a digital thermometer to do this. It can’t be used for the heating process as the heat can affect the display.
Sometimes your yogurt maker can overheat. If the temperature gets too high, the cultures can be damaged. We found that after 8 hours the Euro Cuisine did begin to heat the yogurt above 115℉. That’s not good. It seems the yogurt maker is designed to keep a constant temperature for 8 hours. After that, it will rise into the 120’s.
We found that plugging the unit into a dimmer switch and dimming the power a bit regulated the temperature well over the 24 hour period. You will get the hang of how to do this fairly quickly.
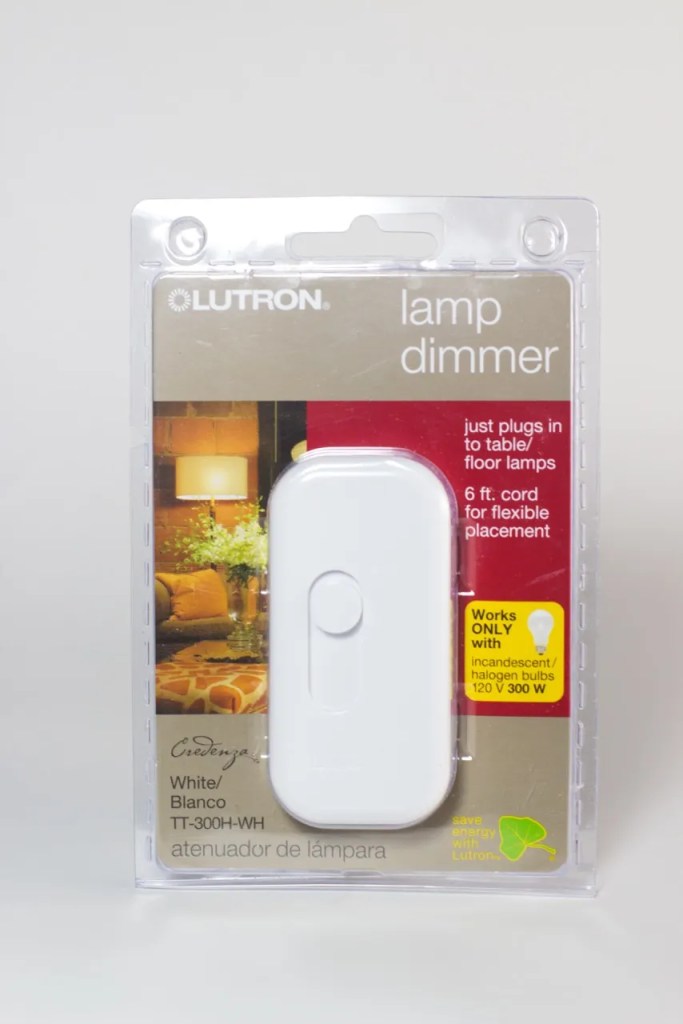
Here’s another important tip. When you lift the lid to check the temperature, lift it straight up and place the lid on a paper towel nearby. Be careful not to drop any droplets of water from the condensation from inside the dome lid into the yogurt. You don’t want to contaminate your yogurt.
If you feel there is a lot of condensation inside the dome, you may want to wipe it dry with a clean paper towel before placing it back over the jars.
Don’t panic. I know this all sounds a little overwhelming, but we’ve found it’s pretty hard to mess up. In fact, we get delicious, creamy yogurt every time.
 Step 9. Place jars in the fridge
After 24 hours, your super nutritious live culture yogurt is done. Cover each jar with their individual tops and carefully put the jars in the fridge. Let them rest and cool for 8 hours, and then they’re ready to enjoy as a snack, grab-and-go lunch, or delicious dessert.
For a twist, blend it into a refreshing smoothie from my complete collection of smoothies and drinks like this Strawberry And Yogurt Smoothie or whip up a batch of Frozen Strawberry Protein Pops!

And there you go. Your yogurt cultures will remain active in the fridge for about 2 weeks. Enjoy! Have a happy and healthy week!
More recipes like this
Dark Chocolate Drizzled Strawberries with Homemade Yogurt – Chocolate drizzled strawberries in yogurt transforms a nutritious bowl of yogurt into a fancy, guilt-free dessert.
How To Cut And Prepare Spaghetti Squash (Includes video!) – Here’s how to cut and cook spaghetti squash for every spaghetti squash recipe. If you close your eyes, you’ll think you’re eating angel hair pasta. That’s why you’re going to love this satisfying, healthy, low carb alternative to pasta.
How To Make Super-Nutritious Sauerkraut Every Time – This is a step-by-step tutorial with beautiful photos showing how to make sauerkraut and restore gut health. You’re going to love this sauerkraut. There’s nothing like the taste of homemade. 
Quick Pan Seared Pork Chops + ButcherBox Review – This delicious recipe includes the secret to tender, juicy chops.
How To Make Beef Bone Broth And Why It’s Good For You – You can use bone broth as stock for your favorite soups or gravies (or even serve it as a refreshing broth). It’s so nutritious and easy to make.
3 Tips To Make Healthier Potato Salad – Follow these tips to reduce the Glycemic Index of your potatoes and then toss them with an avocado mayonnaise dressing for a potato salad that will be healthier for everyone at your table.
Can’t wait to try this recipe? Pin It for later!


How To Make Delicious 24-Hour Probiotic Yogurt Every Time
Ingredients
- 42 ounces organic grass fed whole milk
- 1/8 teaspoon GI ProStart yogurt starter
Instructions
- Slowly heat milk in a clean 3-quart pot over a medium flame until it reaches 180℉. Stir occasionally to keep the milk from scorching. This is to kill any bacteria present in the milk that might interfere with the yogurt making culture42 ounces organic grass fed whole milk
- Turn off the heat and let the milk cool to room temperature (80-90 ℉). We set our pot in an ice bath in order to speed up the cooling process. Stir the milk before determining the final temperature.
- Add 1/8 teaspoon of GI ProStart yogurt starter to a clean measuring cup. Add 1/4 cup of the room temperature milk. Mix well until dissolved.1/8 teaspoon GI ProStart yogurt starter
- Pour the mixture back into the pot and stir it in very well.
- Now carefully divide your milk with yogurt cultures into your jars and set uncovered jars in the yogurt maker. Cover and switch on for 24 hours.
- *Note: The yogurt should be kept at about 110℉. We found that after 8 hours the yogurt began to overheat so it is a good idea to check it. The first time, we lifted the lid and waited for the temperature to come down. However, we found that plugging the unit into a dimmer switch and dimming the power a bit regulated the temperature even better.
- After 24 hours, your super healthy live culture yogurt is done. Carefully, cover each individual jar and put the jars in the fridge. Let them rest and cool for 8 hours.
- Your yogurt cultures will remain active in the fridge for about 2 weeks. Serve plain or stir in your favorite toppings.
Nutrition
- Picanha Steak Recipe - April 23, 2026
- Slow Cooker Steak Tips Recipe - April 17, 2026
- What to Do With Too Much Zucchini (17 Easy Recipes to Use It Up) - March 11, 2026
- Easy Manhattan Clam Chowder Recipe That’s Naturally Gluten Free And Low Carb - December 28, 2025
- Lemon Donuts Recipe - December 8, 2025
Kathryn Grace says
I’m always thrilled to find another home-yogurt maker. Don’t you find it tastes better than any you can buy in the store? I don’t even bother with a yogurt maker anymore. First I learned how to make it in a thermos. Eventually I learned how to make it in my oven with just the oven light. Amazing how easy it is. I’m planning to take some with me when we go on vacation later this summer. I’ve found I can make yogurt in my travel thermos while we’re on the road as long as I have a way to heat the milk and remember to bring along my instant thermometer!
Barbara says
Isn’t that something, you make it in your thermos. It really is so easy. And yes, the taste of homemade is so much better than store bought. 🙂
Margaret E Thibideau says
I was Elaine Gottschall’s client for about 5 years, and I can attest that this method is excellent. But because it is often difficult to find a yoghurt maker that will stay at the same temperature for 24 hours, I devised a simple way to do this using a clean fish tank (yes- an unused clean fish tank) and an aquarium heater. I found a large gallon jar to make four litres of yoghurt. Before starting the batch, you fill the jar with water, and then fill up the fish tank to see how much water you need for displacement of the container. Then wait until the water heats up to the desired temperature BEFORE starting your batch of yoghurt.
Dorina Leslie says
So you can actually make your yogurt in an oven that’s set for 110 degrees?? maybe I should try this first, as opposed to buying the machine, though that looks really nice. I guess my concern is putting the machine into a dimmer switch….
Barbara says
I have only made yogurt this way, Dorina. Let me know how it works for you. It’s so good for ya. 🙂
Marla says
HI Barbara & Nicole,
I make my own yogurt – I do it a little differently – I make 2 gallons at a time by using raw milk, culture, pure beef gelatin, and heat the milk to about 120-130 degrees (I want to keep it unpasteurized so I don’t kill all the goodness of the milk) and ferment it after cooling the milk down to under 112 degrees. I use a large pot and turn my preheat my electric oven on to 170 degrees and wrap the pot in a old towel put it in the oven and turn the oven off for about 8 hours. I also was a little intimidated by making it in the beginning but I finally found what worked best for me and now it is pretty easy. I am glad you found a way to make it that works for you because homemade is so much better in so many ways than store bought. Thanks for sharing on Real Food Fridays. Pinned & tweeted!
Barbara says
Hi Marla! Thanks so much. Homemade really is the way to go. We control what goes in and know that it’s fresh, not to mention delicious. And the 24-hour yogurt has so much healing power. 🙂
Gaye@CalmSexyHealthy says
Thanks for adding this to Let’s Get Real. homemade yogurt really is easy to do, once you get the hang of it!
Barbara says
Hi Gaye! It’s true, it is easy. And there’s nothing like the fresh homemade taste and all the powerful probiotics.
swathiiyer says
Yogurt looks delicious,I too make it at home, thanks for sharing with Hearth and soul blog hop, pinning and tweeting.
Barbara says
Hi Swathi! Thanks. I appreciate that. 🙂
Lori Hil says
Definitely pinning this recipe. Looks so delicious and I’m always looking for ways to increase my healthy bacteria!
Barbara says
Terrific Lori! This yogurt packs a powerfully healthy punch.
Thanks for taking the time to leave your sweet comment. 🙂
The Pramshed says
I love yogurt, and my 11-month daughter does too, sometimes it’s all she eats! I had no idea about 24-hour probiotic yogurt, and the scientific process to make it. It’s great that this yogurt can aid those with celiac disease, and can enjoy some fabulous recipes. Thanks so much for linking up at #fortheloveofBLOG this week. Claire x
Barbara says
Hey Claire, It’s even better when we find out how good it is for us. Right? 🙂
Laura O'Neill (@LauraOinAK) says
Yogurt is a staple in our house, but we’ve never made it ourselves. Hope to try this soon!
I’ve picked this as one of my featured posts for the Healthy Living Link Up. It will be live at 7 p.m. CT here:
https://daybydayinourworld.com/2016/06/healthy-living-link-party-68/
Barbara says
Thanks Laura! I’ll see you there.
emma says
We used to have a yoghurt maker as kids but I don’t really remember using it! This is a great idea for getting probiotics into your diet, especially for kids. Thanks for linking with #freefromfridays
Barbara says
You’re so right, Emma. There’s so much probiotic healing power in this yogurt.
Katie says
Interesting! I’ve thought about making my own yogurt, but haven’t taken the leap yet!
Barbara says
You’ll be amazed at the taste of homemade. 🙂
Nicolette says
Love this post. It brought me right back to when my grandfather would make homemade yogurt and store them in canning jars!
Barbara says
I love hearing that Nicolette. 🙂
Sophia says
This is a great article. Thank you!
I wanted to know, when using the dimmer switch to maintain the temperature, do you dim it from the outset of cooking or do you constantly monitor it and adjust the dimmer accordingly?
I have this model of yogurt maker but haven’t used it yet. I’m a bit nervous about making my first batch. I’m lactose intelorent so I need to make sure all the lactose is digested. And I’m battling SIBO and trying to balance my tummy so need to make sure I don’t kill off the beneficial bacteria.
Thanks again!
John says
Hi Sofia,
I’m sorry to hear about your tummy issues. I know what a burden they can be.
This is how you can get your yogurt maker to maintain a constant 110 – 112 degrees. First, don’t make yogurt right before bedtime. The maker can heat up too high before you check it in the morning. The first couple of times you’ll have to experiment a little with your dimmer. We initially run our Euro Cuisine for 6 – 8 hours without the dimmer. We check the temperature of the yogurt every 2 hours to see how it’s doing. I usually check the same jar so as to not disturb the others. Use a digital thermometer for this purpose. It’s easier to read the temperature. After about 6 – 8 hours you may start to see the temperature start to rise above 110 degrees. You can then connect your dimmer. Make sure your dimmer is initially set to max and then decrease it a little. After 2 hours check it again and adjust your dimmer accordingly. If it’s creeping above 110 just lower it a bit. If it’s too low raise it a little. After several times of making yogurt, you should find out approximately where your dimmer setting should be. I still would check the temperature every 2 hours during waking hours if possible. If it’s at 110 degrees before you go to sleep it should be okay. Ours did jump to 120 degrees one time. Even so, it probably wasn’t at 120 long enough for damage to be done to the cultures. If you’re worried about all the lactose being removed let the yogurt ferment for another 2 hours. I believe 26 hours should be sufficient. After you make yogurt a couple of times you’ll get the hang of it. I hope this helps.
Erin says
Thanks for writing all of this up! Making a batch RIGHT NOW. Perhaps you could make a note about how to check the temp/ get to know the dimmer switch in the actual post, too… since it was the one lingering question I had while staring at all this yogurt equipment. 🙂
Barbara says
Hi, Erin, I trust that you’ve been enjoying your delicious homemade yogurt. All the best with your healthy living journey. 🙂 Thanks for the stars.
Bobbi says
I am lactose intolerant as well. I tried the organic whole milk and the yogurt upset my stomach. I am not sure if it was he casein or what since people told me the 24 hour fermentation process makes it lactose free. I use lactose free milk and I get a semi firm yogurt. I might try adding in gelatin. Still experimenting and open to suggestions and input from other lactose intolerant people. I use th GI pro Yogurt starter and the Luvele yogurt maker. Thank you!
Barbara Bianchi says
Hi Bobbi,
You’re so welcome.
Here’s the link to all my dairy-free recipes including bone broth and homemade sauerkraut:
https://www.glutenfreehomestead.com/category/dairy-free/
I hope you find many new favorite recipes here. Please let me know if you ever have any questions about a recipe.
All the best with your healthy eating journey. 💕
Ryan says
Hi! Quick question. I followed all your instructions only my yogurt is coming out with a clumpy consistency. I was wondering if there is a trick to the smooth store bought type of texture. Please let me know.
Barbara says
Hi Ryan,
Yes, this has happened to me as well. This typically means that the milk was heated too quickly. Try warming the milk very slowly. I hope this helps.
Kristine says
Do you think that if I strain the yogurt to make Greek yogurt and use the whey to make lacto fermented beverages it would be lactose free? Doesn’t the whey turn into lactic acid? Thoughts? Thanks!
Barbara says
Hi, Kristine, Interesting question. When we ferment the yogurt for 24 hours it is mostly lactose-free. So it should remain mostly lactose-free. But I can’t say 100% for sure.
Nicole says
so you check the temperature by opening one of the yogurt containers up and sticking the thermometer into the yogurt? also how long is the yogurt good for in the fridge after you make it?
Barbara says
Hi Nicole,
Great questions.
Set the yogurt jars uncovered in the yogurt maker. Use the dome lid of the yogurt maker as an overall cover. You will not cover the individual jars until they are ready to go into the fridge. When you lift the lid to check the temperature, lift it straight up and place the lid on a paper towel nearby being careful not to drop any droplets of water from the condensation from inside the dome lid into the yogurt. Check the temperature of one of the jars after the first 8 hours.
We usually eat our yogurt right away, but your yogurt cultures will remain active in the fridge for about 2 weeks.
I hope this helps and I hope you enjoy your yogurt.
Reply
Debbie says
This yogurt is very nice but also very tart, I sweeten it with honey for my daughter but will probably use stevia for myself. I am using the pro start and was wondering if others find it to be too tart to eat without a sweetener. I drain the whey and it comes out with a great thick texture.
Barbara says
Hi Debbie,
I’m glad that you’re enjoying the yogurt.
According to the GI Pro Health site, “If a sweet taste is desired you can sweeten your yogurt with fresh fruits or honey. NOTE: When adding sweeteners or fruits and nuts ect. It is always best to add these after the yogurt has cooled and NOT during the yogurt making process.”
Sometimes I drizzle strawberries with dark chocolate over a dish of yogurt like I did in this recipe: https://www.glutenfreehomestead.com/2016/06/dark-chocolate-drizzled-strawberries-homemade-yogurt/ So yummy.
lynn hannay says
Hi my husband is dairy intolerant
can this be made with sheep or goat or almond milk
Barbara says
Hi Lynn,
I haven’t tried this myself, but I understand that you can use goat milk or almond milk and then make yogurt, using the Vegan Yogurt Starter. and Pomona’s Pectin or gelatin as the thickener.
I hope this helps. 🙂
Maren McLaren says
I’m getting ready to do it myself, but all of the checking the temperature, etc. is frustrating; are there any makers for which you don’t have to do that? I work full-time and have 3 kids and am trying to heal my son with newly-diagnosed ulcerative colitis, and checking it all the time isn’t something I can do over 24 hours!
Barbara says
Hi Maren,
It seems that home yogurt makers are designed to ferment for 8 hours. After that they tend to heat up. At 8 hours of fermenting good cultures will be produced but if you want it lactose free it has to go at least 23 hours. We had to experiment with our dimmer a few times before we knew where on the switch a constant temperature would be maintained. Initially we started our yogurt about 6 pm so that we had an idea of how our maker worked and how high the temp would go. Before we went to bed we set the dimmer and then checked it in the morning. If it was ok we let it go. Sometimes in the AM it was a little hot (122 degrees so we knew next time to lower it a little. It took a few times before we had it down pretty good. I don’t think though even at 122 for a few hours there’s going to be a lot of damage to the cultures. If you could spend a Saturday watching it then you’ll have a good idea of how your machine and dimmer will work. I guess you could say that making this stuff is more of an art than a science.
Bobbi says
I own a Luvele yogurt maker. It has a 24 hou timer. Love it!
Robert Lindsey Gilkin says
High count pro biotic Freeze dried like VSL3 ( The forerunner and first recognized by the medical community as a recovery and maintenance product developed by the medical community at the University of Alberta Canada. Going back some years to when Dr s were then only beginning to acknowledge natural is a valid area to develop healthier living. then using good homage probiotic yogurt were key in my recovery from ulcerative colitis . introduced to this simple flora maintenance by the GI specialist who saved my life when I was struck with this horrible ailment. He knows his stuff, lectures around the world tends university summits globally all dealing with Gastro intestinal health and cutting edge developments in treatments and maintenance . In short. you’re right and thank you.
Barbara says
Dear Robert,
Thanks for the informative comment. Glad to hear your health has improved. Consuming some twenty-four hour probiotic yogurt is definitely an important wellness strategy for anyone who has experienced gut dysbiosis.
Noreen says
I just finished a batch in my InstantPot, but I added my Yogourmet brand starter when the temp was 100 degrees! Will this kill my starter? The box directions say add the starter at 108-112 degrees! I have intestinal problems and set it to process for 25 hours!
Barbara Bianchi says
Hi Noreen,
Very good. I think you’ll be o.k. From what I’ve read, over 130℉ would kill the starter bacteria. I haven’t used the InstantPot so I can’t say for sure. I’d love to hear how it goes. 😊
Noreen says
Thanks! Last year I regularly made my yogurt this way, but the last batch I made really upset my stomach after eating a couple of helpings, so I stopped making it! The only thing I did differently was to use low fat milk! I usually use full fat organic milk and also add 16oz of whipping cream to the batch! I need to put on some weight so I’m really hoping this batch will treat me well! It’s now processing with 24 hrs to go!!!
Noreen says
Thank you…..I’m a bit gun shy since the last batch I made a year ago upset my stomach. The only difference was it was the first time using low fat milk and not adding cream to it.
Zeina says
Hi, can we make another batch from the 1st batch and if yes, how many times can we do that?
Thanks
Barbara Bianchi says
Hi Zeina,
Great question. Honestly, I haven’t tested the method of saving some yogurt to make a new batch. I’ve read (somewhere) that we just can’t tell how effective the cultures will be. So I’ve always gone with fresh starter.
But I don’t want to discourage you from giving it a try. I’d love for you to come back and let me know how it goes. 😊
Amber says
Hello. Thanks for amazing directions and tips! My Dr wants me to make scd yogurt with sheep milk for 30 hours and then thoroughly drain. Have seen a few comments elsewhere saying there’s not enough left for the bacteria to eat toward the end to even survive the 24 hours much less 30?
The Dr also wants me to start with trying a teaspoon a day, as mentioned here. Is it ok to make a much smaller amount than called for here? Or does the yogurt maker need to be full to heat appropriately? (have ordered same brand as yours with built in timer)
Thanks so much for your opinion on these questions.
Barbara Bianchi says
Hi Amber,
I haven’t tried to make smaller amounts, but I don’t see why not. It’s really about maintaining the temperature of the yogurt in the jars which you can check periodically.
I hope this helps and I hope you enjoy your yogurt. ❤︎
Amber says
Thanks, Love!
Barbara Bianchi says
You’re so welcome!
Amber says
OK, so my brand new yogurt maker died at about hour four, just before bedtime. The best I could do was wrap the bowl in a towel and put it in the oven by the burning light bulb . From that point on it’s been bt 98 (this morning after about twelve hours) and 102 after the kitchen warmed up mid morning. Is that sufficiently warm? Or is that inviting pathogen overgrowth? Ugh. Don’t want to make myself sick trying to get better. Lol Thanks so much for your help.
Barbara Bianchi says
I’m sorry your yogurt maker died.
I just don’t know about this.
Margaret E Thibideau says
Hi! I had the privilege of being a patient of Elaine Gottschall back in the 19080s when she was doing research at UWO. I needed to figure out how to make a large batch of yoghurt, and at that time, one had to be very creative. So, following the method she outlines EXACTLY in the book, I purchased a large fish tank. Yes- that is correct. I had a large glass resealable jar with a screw top lid that held four litres. I filled the jar with water initially to see how much displacement would occur when I put it into the fish tank filled with water. I then put water in the fish tank with the glass container sitting inside it so figure out how much water was needed in the tank to keep the jar at the correct temperature. After about 3 or 4 days, the tank water maintained its temperature, and I was ready to go. I then dumped out the water in the glass jar, made the yoghurt culture as directed by Elaine, put the cultured milk back in the glass jar, put it into the fish tank with the heated water, and then ready to go. 24 hours later- amazing yoghurt for all of the recipes in the book!
Sam says
I don’t understand why you need to heat the milk if you use pasteurized milk? Have you tried what happens if you don’t heat the milk?
Rita says
Realmente, os alimentos feitos em casa é sinônimo de saúde. O iogurte de vocês está lindo! Lindo e saudável. Achei super fácil de fazer. Esse alimento é ótimo para consumir todas as manhãs. Gostei da receita de sucesso de vocês! Quem deseja se manter saudável, essa receita ajuda bastante! Obrigada.
Charlotte says
Hi I made this recipe using a probiotic capsule that is usually refrigerated (Klaire Labs Lacto-Prime Plus).
I also added 1 tbsp of maple syrup for the entire batch before adding the probiotics.
After 12 hours, the milk was still very liquid so I let it go until about 18 hours. At 18 hours, it was perfect and it tasted good.
Now I am wondering if the probiotics did not work and the milk just naturally thickened from heating? It tasted tangy though in a good way.
Barbara Bianchi says
Hi Charlotte,
I’m glad your yogurt turned out well. Adding maple syrup sounds yummy.
This is according to the GI Pro Health site, “If a sweet taste is desired you can sweeten your yogurt with fresh fruits or honey. NOTE: When adding sweeteners or fruits and nuts ect. It is always best to add these after the yogurt has cooled and NOT during the yogurt making process.”
Sometimes I drizzle strawberries with chocolate over a dish of yogurt like I did in this recipe: https://www.glutenfreehomestead.com/2016/06/dark-chocolate-drizzled-strawberries-homemade-yogurt/
Have a great weekend! ❤️
Blanca says
I needed this! Thanks for sharing!
Barbara Bianchi says
Terrific, Blanca, I’m so glad. And thanks so much for the stars. ❤️
Chandelle says
I have made this recipe many times with great success, however the last few attempts have come out as all whey and a tiny bit of cheesy like stuff. I made sure everything was exact this last batch and the same thing happened. Any idea what might be happening?
Barbara Bianchi says
Hello Chandelle, Thank you so much for sharing your experience with the recipe! I’m really glad to hear that it’s worked well for you in the past. I’m sorry to hear about the recent issues you’ve been having though. It’s strange that it’s suddenly not turning out as expected, especially if you’ve been following the same process.
It’s possible that there might be some variability with the starter culture or the milk you’re using. Sometimes even small changes in ingredients or environmental factors can affect the outcome. Experimenting with a new starter culture might be worth a shot.
I hope you can figure out what’s causing the inconsistency for you! Feel free to reach out if you have any other questions or if there’s anything else I can do to help. ❤️
Angela says
Hi, is there any yogurt starters that you would recommend? The GI ProHealth is no longer available online.
Barbara Bianchi says
Hi Angela,
This is the only starter I’ve used, but you can still buy it direct from GI ProHealth at this link.
I hope this helps and I hope you enjoy your yogurt. Have a great weekend.